Has your iPhone's memory become full and you are looking for some solutions that help you free up a little of this space to store additional content on the phone's memory? Congratulations, you have come to the right place, where we decided to show you through this article a set of practical procedures and solutions to solve the problem of storage space full on the iPhone without deleting any personal data or important applications.
You can also check out The cause of the phone overheating Why does it overheat and how to solve this problem.
Free up space on the storage memory on the iPhone
The storage space is full on the iPhone is a very annoying problem, but it is actually a very common problem, but it is expected given that Apple does not allow us to increase the storage space due to the lack of a microSD card reader.
But don't worry. You can still free up a good amount of space by deleting a part of the system data, which is known as System Data, which was previously known as Other, without affecting in any way your precious data that you keep.
Of course, the partial system data or System Data is a collection of data that consists of cache data, records, Siri voices, and many other files that the user may not need. Mostly, this data does not take up much space of phone memory, but as time continues, this data accumulates and starts to use more space of phone internal memory.
If this is the case for you, then this might actually be a good time to step in and get rid of some of this data as long as you no longer need it and free up a decent amount of phone memory.
You can also read our previous article in which we talked about most of them iPhone problems common and how to solve it.
Now let's start with how to view system data files on your iPhone.
How to check System Data files on iPhone phones

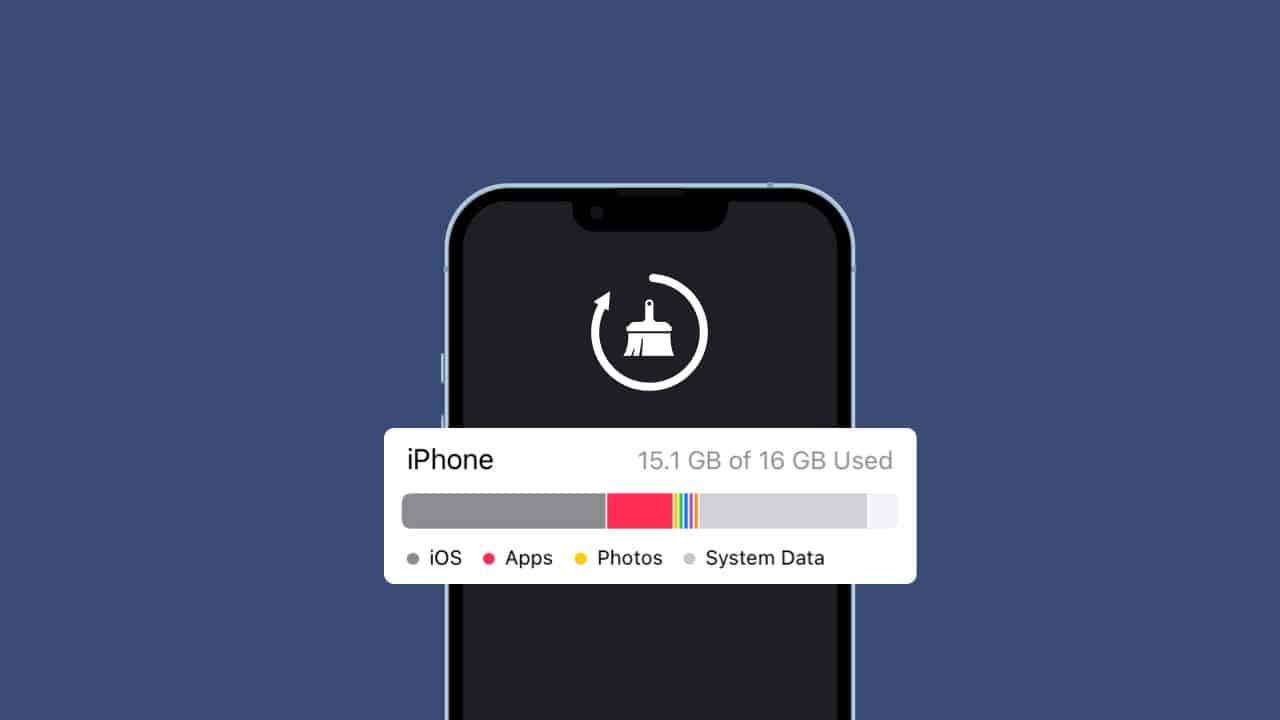
First, go to Settings, then General, then iPhone Storage.
Secondly, you will notice the presence of a bar in the form of a chart showing you the space consumed by all the phone data. For example, the percentage that appears in red is the space used by your applications.
While the dark gray color shows the space occupied by iOS. While playing pictures and media, additional space is taken from this bar.
After that, when you look at the System Data space or system data, which was previously known as “Other”, you will find it appearing in light gray, and this is the space occupied by the system data.
If this data is taking up a large amount of memory, you can start by deleting some data from it to free up memory space.
Now scroll down until you skip the Apps section and reach the System Data section under the iOS section. If you look at the previous example image, you will notice that the space occupied by the system data is 10.48 GB.
How to clean system data on iPhone
Unfortunately, iOS does not provide a direct way to delete system data, instead you will have to perform some actions that may require some time to be able to get rid of them. But if the system data space on your phone does not exceed 5GB then it is not necessary for you to do anything.
But if the space occupied by this data is very large, that is, more than 10 GB, then in this case you can follow the following steps to clean it.
First method: Delete browser history and temporary cache data
As you continue to rely on the Safari browser in order to access websites, the browser begins to store a huge set of data that will improve your browsing experience and make it faster and smoother.
But over time, your cache data and browsing history starts draining your storage space. In this case, you can delete these logs to free up memory space as well as speed up browser performance.
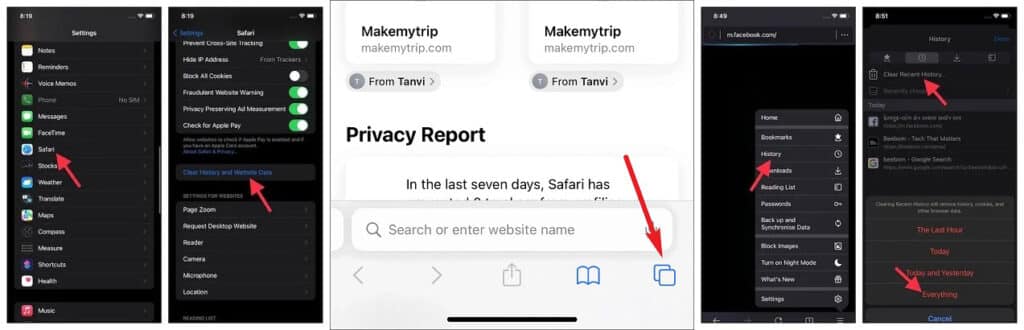
- First, head to the Settings app.
- Then click on the Safari tab.
- After that click on Tab Clear History and Website Data.
- You will see a pop-up asking you to confirm the operation, click Clear History and Data For confirmation.
In fact, there is another way that allows you to delete browsing history and website data from within the Safari browser itself without causing the browser to close. If you prefer this method, follow these steps:
- Open Safari browser.
- On the toolbar at the bottom of the browser, click the Bookmarks icon Bookmarks.
- go to records"HistoryAnd click the Clean option.Clearlocated in the lower-right corner.
- Then the Safari browser allows you to clear the logs based on specific times such as “All recordsClick “Today and Yesterday” or “Today” or “Last Hour”.All records“ or ”All Time“.
In this way, the Safari browser will delete all records without closing the browser.
If you rely on Google Chrome, you can also delete browsing history and cache data just like we did on Safari.
- Open the Google Chrome application.
- Click Three dots symbol It's in the lower-right corner of the screen.
- Select recordsHistoryThen click Delete browsing data “Clear Browsing Data“.
Choose the time period you want and click again on Clear browsing data.
- If you depend on the Mozilla Firefox browser, you can delete browsing history and website data by following these steps:
- Open Firefox browser.
- Click a symbol The three bars From the bottom right corner to open the menu.
- Click on the Records option.HistoryThen click Delete existing records “Clear Recent History“.
- A list will appear with several options, choose from them.everything“ or ”Everythingto delete all records.
The second method: Disable iCloud Photo Service

Sometimes due to internet connection issues, the iCloud service fails to sync your photos properly. However, it still retains some leftover information from the failed sync process that takes up system data.
Unfortunately, it is difficult to identify the folder that iCloud failed to sync your photos, but because it can take up a lot of space, it is possible to clean it up by disabling the iCloud photo service for some time.
- Go to Settings then GENERAL then Pictures then iCloud photos Move the cursor in front of iCloud photos so that it turns gray.
- Also open Settings then GENERAL then Pictures then Image uploads or My Photo Streams Likewise, disable it as well.
Third method: Delete message attachments

It is necessary to constantly take care of deleting message attachments because they can take up a large amount of phone memory. The good news is that the iPhone imessages app allows the ability to track and delete message attachments manually.
- Go to Settings, then General, then iPhone Storage.iPhone Storage“.
- Click an option Messages.
- under the Documents section.DocumentsYou will notice that a special section with photos, videos, and chats appears. In this case, you will need to go to each of these categories and delete them manually to free up the space they occupy.
- At the same time, you can also get rid of messages that you no longer need. The more messages you have, the more storage space they take up. Therefore, it is better to delete them as long as they are no longer necessary for you.
- Go to Settings then Messages then Keep messages “Keep Messages“.
- Then choose to keep messages for 30 days or one year instead of always.
- Then you will be prompted to confirm the deletion of old messages that have exceeded the time period that you just set. Click button Delete “Deleteto delete those messages.
Fourth method: Delete application cache files and remove unnecessary applications
With your continuous use of applications, you start to keep a large set of cache files that improve your use experience and speed up their opening whenever you try to use them later. But over time, cache files build up and can not only take up a lot of storage space but can cause your app to crash and stop responding normally.
Unfortunately, iOS sometimes does not allow deleting cache files for some applications, in which case you will have to uninstall the application and reinstall it again to get rid of your cache files. But there are still an infinite number of apps that give you the ability to delete them manually.
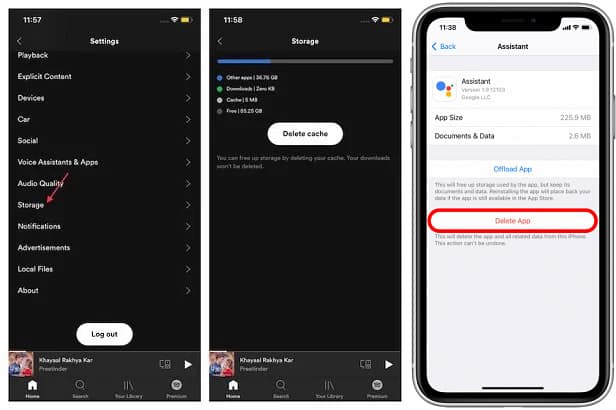
- Open any application you want.
- Go to options Settings inside the app.
- Look for an option that allows you to delete temporary files.Clear Cache“.
- If the app does not allow you to delete your temporary files, then you have no choice but to delete the app and reinstall it again.
- Go to Settings, then General, then iPhone Storage.iPhone Storage“.
Scroll through the Apps section to find the app you want to delete. Note that the list of applications is categorized according to the priority of the applications that use the most storage space.
For example, you will see that the most space consuming apps are those at the top of the list. Choose any application and delete it by clicking on the delete application tab or “Delete App.” After that, you can go to the App Store and reinstall the application again.

There is another great way that allows you to delete the unused app automatically without any manual intervention from you. In this way, once the app is inactive for some time, the iOS system will remove the app and keep all the registration data of that app, i.e. your ID name and password on that app will still be saved on the phone.
But the app's cache files and some other extra data associated with that same app will be deleted.
Go to Settings then GENERAL then iPhone storage “iPhone StorageThen enable the feature Offload Unused Apps.
If your phone is running iOS 15 or later, go to Settings, then the App Store, and then enable the Offload Unused Apps feature.
At the same time, you can manually set auto-delete for apps individually by going to Settings > General > iPhone Storage and select any app from the list and tap it, then tap the Offload App tab.
Fifth method: Update to the latest version of the system

Older versions of iOS had the problem of not being able to delete system data regularly which could cause the storage space to fill up quickly. Therefore, it is imperative that you make sure that you update your phone to the latest iOS version available for your phone model in order to delete all the old system files from the phone.
- Go to Settings Then head to an option GENERAL Then click on an option system update “Software Update“.
- Download the latest update and install it right away.
Sixth method: Limit streaming apps as much as possible

Your streaming apps use a large amount of system data in the form of cache files to improve your experience on those apps.
Go to Settings and then click on one of the streaming applications that you use often such as YouTube or any other video streaming service application and then click on Storage”StorageThen click the Offload App option to delete its cache files.
Seventh method: Check voice memos and notes

Every time you try to use voice memos or notes app to record this data is kept in the system data partition which may start to take up a lot of storage space.
In this case, you will need to go to these audio files or memos and manually delete everything that you no longer need.
- Open the Notes app.
- Choose the folder you want to get rid of the notes in.
- Click an option Modification Who's in upper right corner.
- Select the note or group of notes you want to delete.
- from lower left corner Click an option Delete.
- To delete voice memos, open the Voice Memos app.
- Click an option Modification from the upper right corner.
- From the list of voice memos, select all the memos you want to get rid of.
- After that click icon Delete from lower right corner.
Eighth method: Disable background app refresh and location

Naturally, applications try to store a new set of data in cache files once they have finished updating to the latest version.
It is also known that there are some applications that keep your geographical location data once you share the location with them. In this case, you will need to disable background app identification and disable the geolocation service.
- Go to Settings then GENERAL.
- Click a property Background apps refresh or “Background App Refresh“.
- Qom Disable the feature by moving the cursor next to it To change its color to grey.
- Also turn to Settings Again, then click on an option privacy “PrivacyThen click on Location Services.Location Servicesand disable it.
Method nine: Factory reset the phone

If all of the aforementioned solutions did not succeed in freeing up space on your phone's memory, unfortunately, you no longer have any other choice but to reset the phone to factory settings.
- First open Settings Then click on an option iCloud.
- Now enable the indicator in front of all your applications.
- After that click on an option Keep an iCloud copy “iCloud Backup" then "Backup Now“.
- Once the backup is done, go back to Settings.
- Then go to option GENERAL.
- Scroll down to the option Transfer or reset iPhone “Transfer or reset iPhone“.
- Now click Delete everything “Erase all content and settings.” Then click onFollow upor Continue.
- Enter your password to continue and then click Delete Data.
Now, once the formatting process is completed, your phone will restart automatically and you will see the welcome screen. Follow the onscreen steps until you get to the Data and apps screen.
Sign in with your Apple account and select the iCloud backup you want to restore.
Then the phone will start to retrieve the backup, but first make sure that there is sufficient battery capacity and a stable Internet connection before starting the process. Once the recovery process is completed, you can start setting up your phone again.

But if you prefer to backup and restore via the iTunes service, follow these steps: But before you start, make sure that you have the latest version of the iTunes program on your computer, whether it is running Windows or Mac. But if your Mac is running Catalina or later, you can rely on Finder instead of iTunes.
- Now connect your phone to the computer and open iTunes on the computer.
- A pop-up screen will appear on the phone asking you to trust the device, click on “Trustto trust a computer.
- You will see a small icon in the upper left corner of the program in the form of a phone, click on it.
- Now from the bottom section Automatically Back Up Akhtar"this computer“.
- Select an option Encrypt local backup Choose a specific password and you must always remember it.
- Now click on an option Back Up Now.
- Once the backup process is completed, click on the option Restore iPhone Follow the instructions shown on the screen.
- Once done click Restore iPhone Choose the backup you want to restore on your device.
- Enter the password you just set to complete the recovery process.
- Do not attempt to disconnect the phone from the computer or the recovery process may fail.
Once the recovery process is completed check the storage space on your phone. Do you notice now that the storage space occupied by system data has become noticeably smaller?
Conclusion
These were all possible attempts to free up space on your iPhone's memory and get rid of some of the data occupied by system data. It is definitely better to follow these tricks one at a time so that your phone does not fill up with data over time.