We show you a step-by-step explanation of how to install Windows 11 as a virtual system on VirtualBox. Windows 11 is the latest operating system from Microsoft, but due to the limitations of the operating requirements that it needs, it may be difficult for most users to overcome it.
These restrictions are represented by the need for a TMP 2.0 security chip and the support of the computer platform for the Secure Boot process, and if the platform (motherboard and central processor) is not qualified to support these features, you will not be able to install Windows 11.
Install Windows 11 as a virtual system on VirtualBox
Therefore, this is the right time to rely on virtual operating system programs such as Hyper-V or VirtualBox that allow the user the ability to install Windows 11 in a virtual environment, bypassing all the strict restrictions and operating requirements that Windows 11 needs.
Therefore, if you would like to experience the use of Windows 11 on your computer even though the computer does not have official operating requirements, do not worry, you can still install the operating system in a virtual working environment using VirtualBox or Hyper-V, but we prefer the first program because it will give you More controls, customizations and the ability to access the UIFI BIOS interface.
First: Entering the BIOS interface of the motherboard or laptop
In order to be able to install Windows 11 using the VirtualBox program, you will first have to activate the Virtualization feature from the BIOS settings. The real working environment that operating systems need.
In order to be able to activate this feature, you will need to enter the BIOS by restarting the computer and then clicking on the key that gives you the ability to enter the BIOS, often by pressing and holding the Del, F2, or F8 key, or depending on the characteristics of your device. profile.
You can check the settings for entering the BIOS program on your device by yourself through the instruction manual that came with the device or by searching on the Internet.
Secondly: Enable Virtualization on Windows 11
Unfortunately, we cannot guide you to the location of the Virtualization feature on your devices, because the path of its presence differs from device to device and from a motherboard to another, depending on the manufacturer.
But in most cases, you will find this feature either within the System Configurations or System Advanced settings, or the settings listed below any of them.
Take your time to search for the one and once you find it enable it and agree to restart your computer and it will take effect immediately.
Third: Create a virtual Windows 11 on VirtualBox
You will have to download a software version VirtualBox 7.0 This is the latest version released by Oracle after a long slumber of more than four years.
Do not worry, the size of the program does not exceed 100MB at most. Once you download the program, install it on your device that you want to set Windows 11 on.

- Once you have finished downloading and installing the program, open the program and from the top toolbar, click on the option “New“.
- A new window titled will appear Create Virtual Machine And inside it many settings options.
- Now in front ofNameName it a placebo system and so be it Windows 11.

- Then from the front tabISO ImageFind the path to the version of Windows 11 you downloaded online.
- Then from the bottom, put a tick (correct) in the small box next to an option Skip Unattended Installation.
- At the bottom, click on the Next tab.Next“.

- In the next step you will need To set a specific amount of RAM (rams) And a specific number of central processor cores.
- Windows 11 requires RAM Minimum of 4 GB It contains a central processor Two or more processing cores. Therefore, it is best to set a RAM space of at least 4 GB and set two or more processing cores, depending on the components of your device.
- Then put a tick (Right) in the small box next to an option Enable EFI (Special OSes Only).
- Then click on the "Next" tab from the bottom.Next“.

- In the next window titled Virtual Hard Disk Select an option Create a Virtual Hard Disk Now.
- It is in front of the pointer Disk Size Set storage space Not less than 64 GB.
- If you have more free storage space, it is better to increase the storage space up to 80 or 100 GB if possible.

- Then click on the "Next" tab from the bottom.Next“.
- Then click on the tabFinishIn this way, I am fully prepared to install Windows 11 in a virtual environment.
Fourthly: How to install Windows 11 using VirtualBox
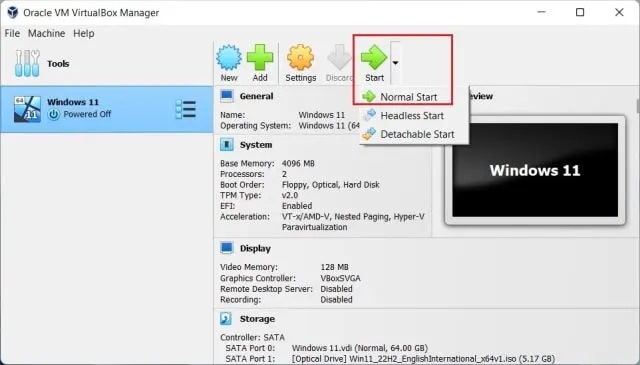
- In the first step, from the top toolbar of VirtualBox, click Tab Start Then choose Normal Start.
- Wait a few moments, and the Windows 11 installation process will start within a few seconds.
- Now you can simply complete the steps to install Windows 11 as you would any previous operating system.

- Now, as you can see for yourself through the previous example image, Windows 11 did not require verification of the presence of the TMP 2.0 security chip or the need to activate the regular Secure Boot feature, as it does in its default state.
- Complete the Windows 11 installation steps as you would any other operating system.

Note before starting: The latest version of VirtualBox supports both the TMP 1.2 security chip and the TMP 2.0 chip and the Secure Boot system by default, which allows the ability to install Windows 11 easily and smoothly on any computer that contains only the components necessary to run Windows such as 4 GB of RAM and a central processor It has two or more processing cores and at least 64GB of free storage space.
But it gets rid of the tough limitations imposed by the operating system such as the TMP 2.0 chip and the Secure Boot feature which are often the biggest limitation for most users in being able to install Windows 11.
Conclusion
Although the method of running Windows 11 as a virtual system using VirtualBox is safe and free from any difficulties or complications, but you should expect some limitations while using the operating system.
Don't worry, most of your normal settings and controls will still be harnessed to use normally.
But since it is not the official way to install the operating system, it is inevitable that you will encounter some problems or limitations while using the system.
But at least in this way you bypass the main limitations in order to experience Windows 11. But if you are not satisfied with the performance of VirtualBox, there are still many alternatives that you can rely on, such as VMware Workstation Pro, VMware Fusion, QEMU, Parallels Desktop, and many more. other alternatives. But in the end, you'll find VirtualBox covers most of your needs.