Audio recording is a process that allows the user to record the sound he speaks or hears using a smartphone, meaning you can record internal or external sound, or both (depending on your needs).
In this article, we show you how to record internal and external sound on Android phones, whether you want to record calls, record your phone screen with your voice, or even record any other sound on your phone.
Record internal and external audio on Android
One of the best features your Android phone has is the ability to record internal and external audio.
In other words, you can record your voice and the phone's voice simultaneously. This feature is useful in countless cases and uses including recording voice notes, press conferences, meetings, class lectures, conversations, important reminders, and even you can use it to record music or broadcast games on the Internet.
Also read: How to Record calls on the iPhone Step by Step.
Regardless of the scenario or the motive behind your need for a method that allows you to be able to record your voice and the sound of the phone, in this article we will explain with you the steps on how to implement this with ease.
Yes, the audio recordings will not be of the same quality that can be obtained from digital voice recorders, but with the use of the right tools and applications, you can still get high-resolution audio recordings without having to incur any additional hardware expenses.
First: How to record external audio on Android

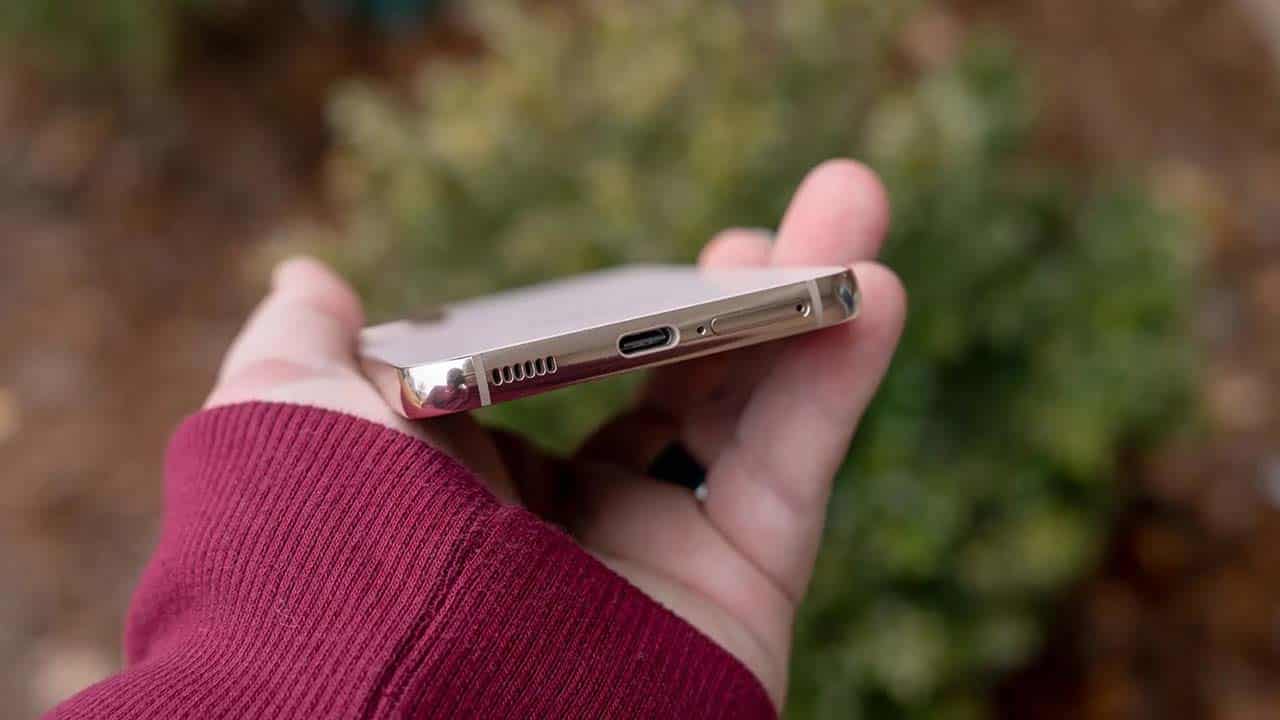
What is meant by external sound is the sound that occurs in the place surrounding the phone, whether it is the office, classroom, home, or outdoors. In order to be able to record any external sound around the phone, you can simply rely on the microphone built into the phone, which is often located on the bottom edge of the phone next to the charging port. On the top edge of the phone, you will find one or more additional microphones.
But before you start relying on any of them, you should test these mics to see which one offers the best sound quality.
If this solution is not suitable for you, or you feel that the phone’s microphone is weak and the sound quality from it seems poor, you can instead use your earphone, whether it is a wired or wireless headset, and use the built-in microphones to improve the quality of the recordings. But while using any of the audio recording applications, you should choose the sound source so that the built-in microphone in the phone is not used for recording.
Do not worry, all audio recording applications contain an option that allows you to control the sound source, at least the applications that we will get to know with you shortly.
While there are already many audio recording applications but only a few of them guarantee you high quality recordings with pinpoint detail and clarity. But if you do not prefer to rely on external applications, you can still use the voice recorder built into the phone, but I do not guarantee that you will get good results from it because it is often just a sub-addition to a basic feature in the phone. If you want to get good results, it is necessary to use an external application.
In order not to get too confused between the flood of applications on the Google Play Store, you can use an application Dolby On Free. Although it is a simple voice recorder but there are many behind the scenes features that you can take advantage of. Its graphical interface is lively and vibrant, and all you have to do is click the large microphone button in the bottom center of the screen to start the recording process.
After you are done you can click again on the stop button. But that doesn't mean you've reached the end. It will take some time for the app to start processing the recording in order to get rid of distortion, noise, adjust dynamic equalizer, compression level, boost sound quality and more next settings. If all this is not enough for you then let me tell you that you can use Dolby On in video recordings as well or do live streaming.
Once the recording has been processed, you can find the final file in the Music menu. For convenience, you can tap the music notation icon at the bottom left of the app's main screen to instantly go to all your audio recordings. That's all, but it's not over yet. If you are not satisfied with the results, there are still more options that the application gives you in order to improve the quality of the recordings.
All you have to do is select the specific audio recording and then click on the “Tools” button in the bottom left corner. From there you can adjust the distortion level, bass boost, gain, treble, or use any of the preset audio controls if you don't want to adjust manually.
{To download the Dolby On app}
Secondly: How to record internal voice on Android
In the past, it was difficult to be able to record internal audio on Android. But since the launch of Android 10, all smartphones have a screen recording feature that includes internal audio recording as well. Whether you own a Samsung, Xiaomi, Oppo, OnePlus, Pixel or Vivo phone, you will find the video screen recording feature available, and it is often easy to access it through the quick settings panel by swiping from top to bottom.
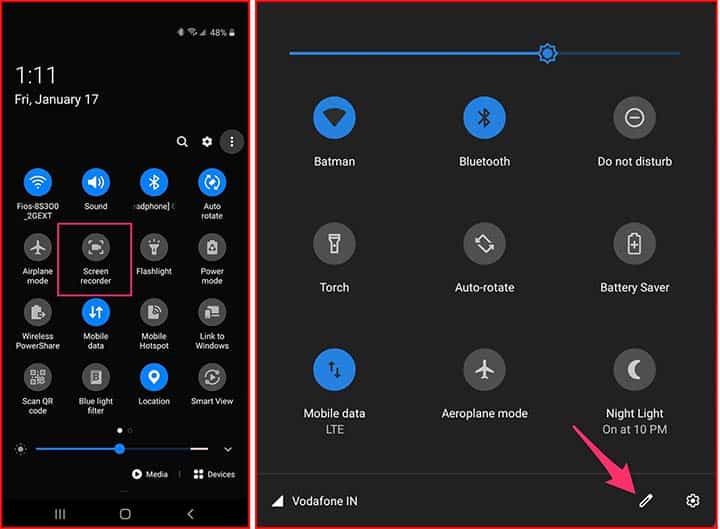
In order to be able to record the internal audio of the phone, pull down the notification panel from the top and tap on the Screen Recorder option.
However, if you do not find this option available in the quick settings panel, you will have to add it first through the settings – the path to adding any option to the quick settings panel may differ depending on the type and model of the phone, but you will often find a small pen icon in the quick settings panel, which gives you the ability to Add any additional option to the panel.
Once the option is added click on screen recorder and then click on the gear icon to adjust the settings and from the list of options click on the “Audio Source” option and from the pop-up choose “Internal Audio”.

If you find the default screen recorder feature on your phone, there is no problem, just use any of the third-party screen recording apps on the Google Play Store.
Also read: Top 10 mobile screen capture and recording apps for iPhone and Android phones
One of the best applications that we recommend is the application AZ Screen Recorder. After downloading and installing the application, go to the application settings, activate the “Record Audio” option, click on the “Audio Source” option, and select “Internal Audio”.
{Download the AZ Screen Recorder app}
4 more ways to record audio on Android devices
Android devices make it easy to record external audio without using any expensive recording equipment and you can also use the audio recorder that comes pre-installed on your phone. You can also capture system sounds and add voiceovers if necessary. Here we will explore 4 excellent ways to record audio using your Android phone.
1. Record audio into the phone via a voice recorder pre-existed on your phone
Most modern Android phones come with a voice recorder or recording app installed. Our OnePlus Android phone has a Recorder app, so we'll show you the steps to record audio using it. The steps for your phone's built-in recording app may be slightly different.
- Swipe up from the bottom of the phone screen to open the app drawer. Look for registered The application and run it.
- Click on the round Microphone button Below to start recording. If you haven't already enabled it, you'll need to give the recorder app permission to use your microphone.
- Speak into the microphone to record your voice. Most phone microphones are located at the bottom of the phone, so make sure to keep a little distance from the microphone when you speak. If you are recording some other audio clips, point the microphone towards the direction of the sound. Do not accidentally cover the microphone with your hand while holding the phone.
- Once you start recording, you can use the timer that appears to keep track of how long. When you finish recording, press Stop button.
- Then, to save the recording, press Check mark In the upper right corner or Qaf button, depending on your device. This will bring up the option to name and save your recording. If you are not satisfied with the recording, click Gold X in the upper-right corner, then tap wipe up.
This way, you can easily make recordings on your phone without the need for a third-party app or additional hardware. All your saved recordings will be available in the Recorder app under All recordings When you open the application.
To share your recordings on social media or email, open All recordings In the dialer application. Long press on recording and select Involved From the bottom menu. Then choose the platform you want.
For clear and better recordings, choose a quiet, large room with the windows closed and no fans running. Sometimes, the slightest sounds can be picked up in the recording. It is also best to record in a room with curtains and cabinets rather than bare walls, as this will prevent echoes.
2. Use the screen recording feature on your phone
Most phones running Android 10 or later have a built-in screen recording feature, which you can use to record audio. The procedure may vary slightly depending on your device, but here are the steps for your OnePlus Android phone:
- Swipe down from the top of the phone screen twice to unlock Quick settings menu. You may need to swipe left to locate Screen recorder feature. Click on it, and the Screen Recorder menu will appear on the screen along with the buttons for that record, My voice, microphone, And Close or Qaf.
- Click on either of them My voice Or the microphone button. Options for System sound recording or Record microphone sound will appear on the screen.
- He chooses Microphone sound To capture your voice or other external sounds using your phone's microphone.
- If you want to record the sound of an app or game, choose System sound recording option. Select the app or game you want to record, then tap red Register button. The screen recording will start, as will the timer.
- Click on Stop button to pause recording and then press He plays Button to resume.
- When you finish recording, press White tick mark To save the recording. Your screen recording will be saved in the phone gallery. You can also access screen recording by heading to Videos Section in my files program.


You can use the screen recorder feature to share your gameplay and record your commentary. For this, select both System sound recording And Record microphone sound Options. Then, play your game and speak into your phone's microphone to highlight exciting moments.
You can view recorded videos on screen, edit and trim them, apply cool filters, or even add music to them. You can also share the recording via email, social media or USB cable.
3. Record audio using a third-party app
If your phone doesn't have a screen recorder, you can download one from the Google Play Store. For this tutorial, we chose XRecorder from InShot.
You can record phone audio via one of the best screen recorders for Android with many other features, including the ability to record internal and external audio simultaneously.
download: XRecorder (In-app purchases available)
Open the XRecorder app on your Android device and follow these steps:
- He chooses Enable floating icon And then Display on other apps To display a list of floating icons above the applications. then, Allow XRecorder to access photos and videos.
- Click on Let's go Icon in the application to go to its settings. Then select Sound settings under video type
- He chooses microphone, Inner voice, or Internal and microphone, depending on what you plan to record.
- Now, open the app or game you want to record. Tap on the XRecorder icon floating on your screen.
- Select the record Button to start recording. The recording timer will appear immediately.
- When you're done, tap the floating icon and press red Qaf button. Your video will be saved to the XRecorder app, and you can edit it before sharing it.
There are many ways to record the screen of your Android phone besides using apps like XRecorder. So, feel free to explore other options if you are not a fan of this app.
4. Record audio on your phone using an external microphone
If you're a content creator or vlogger, you know that audio quality is crucial to getting your message across to your audience. Although your phone's built-in microphones can do a reasonable job, investing in an external microphone can ensure high-quality audio recordings.
You have several microphone options for your Android phone to fit your budget, including affordable microphones that you can plug into your phone's 3.5mm headphone jack.
If your phone lacks a headphone jack, you can opt for a USB-C microphone to connect to your device and record audio. And if that's not convenient enough, you can get wireless Bluetooth microphones that can be clipped to your shirt to record your voice while vlogging.
Conclusion
This was how to record internal and external audio on Android and it is a useful feature in many cases.
But if you want a trick that allows you to secretly record audio without being noticed by anyone close to you, you may rely on an application such as Secret Voice Recorder, which gives you the ability to start recording audio immediately by clicking on the play button three times in a row, but you may find in the application settings other options to enable Registration initiation process.