You surely have many sensitive files on your computer that you don't want to end up falling into the wrong hands. Therefore, we show you an explanation of how to protect folders and files with a password or secret number on computers (Windows / Mac) to protect against hackers.
Protect folders and files with a password
Whether these are your professional files or important family videos that you're afraid of losing, it's essential that you protect them and keep them as secret as possible.
While the process of encrypting and protecting folders with a password is not very important for some users, if you share your computer with a family member or friend, it is best to consider protecting your private files so that they are not accidentally deleted.
Sometimes, we keep an endless number of passwords for our online accounts inside a document or text file so that we can recover them if we forget them.
These files are very necessary because without them you will lose all your accounts and you will have extreme difficulty remembering them all, especially if you do not use a password manager or do not keep a backup copy of this file on the cloud. Therefore, let us briefly explain to you what is the ideal way to protect folders and files and encrypt them with a password on computers running Windows or Mac.
Read also the Review Plus article How to lock applications with a password A favorite explanation of how to lock applications and notifications with a password or fingerprint on smartphones.
█ How to protect and encrypt files with a password on Windows
In fact, there is more than one method offered by Microsoft in order to hide files on Windows, and you surely already know about these methods.
But what if you are afraid that someone will be able to access these files? Of course, hiding files is not the best way to protect files from unauthorized access.
Therefore, you should rely on the encryption tools provided by Microsoft to encrypt and password protect files and documents. Or you can of course rely on external software.
However, we recommend using the default Windows tools so you don't have to pay any money for external software.
Through the standard encryption feature in Windows 10 or Windows 11, Microsoft is trying to give you the ability to encrypt files with a password and lock them permanently.
This means that if someone manages to copy these files and transfer them to another computer or any other device (phone, tablet) they will not be able to open the files unless they know your password.
However, try to use a strong and unique password to encrypt your files so that no one but you can guess or guess them.
At the same time, you must always remember this password because without it you will not have access to these files again. Now to protect the files with a password, follow these steps:
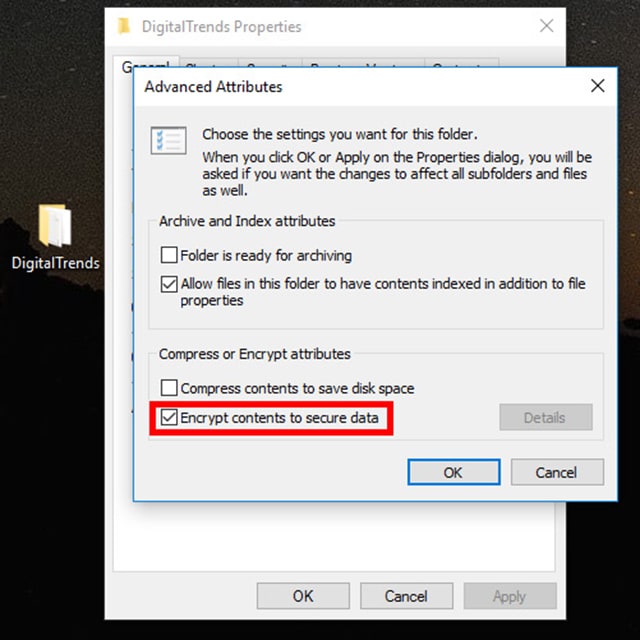
- Right click (right click) Click on the folder or file you want to encrypt Enter your password and choose from the drop-down list Properties.
- From the Properties window, click an option Advanced From the bottom.
- From a window Advanced Attributes Activate the box next to Encrypt contents to secure data.
- Finally click the button Ok then Apply.
- You'll see an optional pop-up message to select whether you want to encrypt all files inside or just encrypt the folder from the outside.
- Choose what suits you and click Ok.
Depending on the size of the folder and the size of the files it contains inside, the encryption process may take a little time. But rest assured that it will be worth all the waiting because in this way you have ensured that no one will be able to access these files through any means, no matter how skilled that person is in working on the Windows system.
Most importantly, file encryption means that they will be completely protected from virus and malware attacks and cannot be hacked by any malicious tools or software. If you try to look at the files inside this file, you will notice that a lock symbol appears at the top of each file inside.
In this way, all your data is completely safe, whether from tampering with others, curious and intrusive people in your home, or even from external threats.
█ Protect files and folders with 7-ZIP
For older versions of Windows, such as Windows 8.1/8/7, they do not have that much protection. So, you will have to use any third-party tools.
Unfortunately, most third-party solutions are paid software and contain many tools that may be redundant for your needs. So, the best software you can use that will not cost you anything is 7-ZIP.
We believe that you are familiar enough with 7-ZIP and there is a high chance that it is already installed on your computer. It is a great program for compressing and decompressing files. But it offers many additional tools built into it that most people don't take advantage of.
It is a very wonderful program that protects files and compresses them brilliantly so that they are not exposed to any external threats. But the only downside to the tool is that you will have to decompress the files in order to be able to encrypt them with a password. Here's what to do:
» First: In the first step download a program 7-ZIP On your device if you don't already have it. Remember to download the
» Secondly: From within 7-ZIP, locate the folder containing the important files you wish to encrypt. After selecting the folder, click on the green mark in the upper left corner of the program. Another way, of course, is by dragging and dropping the folder into the program interface itself.
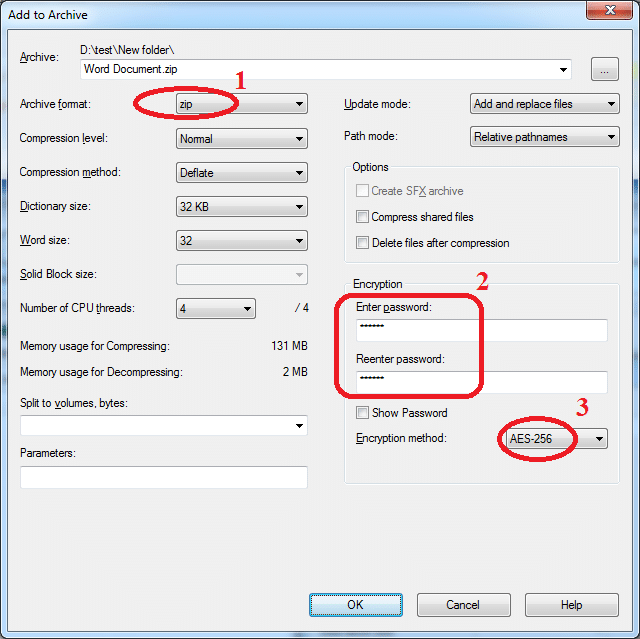
» Third: You can skip most of the settings for the folders since you don't want to compress them or anything like that. However, you must select the ZIP format from the drop-down list to ensure that the folder and files are compatible with any other computer even if it does not have 7-ZIP installed.
» Fourthly: On the right side of the window, you can set a new password of your choice. Once finished, click Ok to allow the program to create an additional copy of the folders, compress them, and then encrypt them with your password.
» Fifth: All you have to do is test this new file and try to access any content inside it. If you notice that you are unable to access it until you enter the password, then things are working exactly as intended. Now, delete the original folder because you no longer need it, and keep the new folder (password protected) in a safe place.
Also read: How to close the browser with a password To protect your privacy?
█ Protect storage partitions with Windows BitLocker
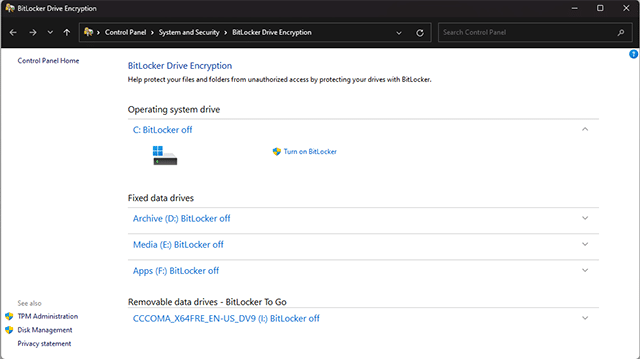
What if you want more than just file or folder protection? What if you want to protect an entire partition? In this case, you can use the default BitLocker feature in Windows. With this feature, you can encrypt an entire storage disk, a specific partition, a storage partition from external storage solutions, or even an entire computer.
This way, your encrypted storage partitions or drives will remain permanently protected, and no one except you (except those with access and password) will be able to see the information and data inside.
Just note that BitLocker relies on the main security tool, the Trusted Platform Module, which is technically known as a trusted system module. Once BitLocker is set to lock a storage partition on your device, you won't be able to access it after entering your password every time you try to unlock your computer again.
Better yet, you'll also get a backup emergency key, so if you forget your original password, you'll be able to recover the encrypted storage partition using the backup encryption key. The important thing for you is that this feature is available on all Windows systems starting with Windows 7. However, it is not available on all versions, especially Home. So, you will have to first check if it is available by following these steps:
» First: In the Start Menu, search for Manage BitLocker and open it from the first result. Wait a little while until the tool appears. If you do not see the tool in the Start menu, this means that your version of Windows does not support BitLocker.
» Secondly: Windows will start checking your system settings before using BitLocker. If Windows finds that TPM is disabled, it will enable it for you. You may be required to restart your computer more than once in order to activate the TPM.
» Third: Before starting the encryption process, you will be prompted to enter a password for standard encryption and an additional password for emergency recovery. You will have to do this thing every time you will try to restart your computer and access the storage partition that you wish to encrypt.
» Fourthly: You can choose to save the recovery key to a cloud file, external storage, or your Microsoft account.
» Fifth: After entering the password and backup password, the tool will ask you how much or how much data you want to encrypt on this storage disk.
» Sixthly: You will have two different options: either encrypt the storage space used on this drive or encrypt the entire drive. Note that by “storage disk” we mean any partition or sector. The encryption process may take a long time depending on the size of the data and the size of the storage partition itself, especially if you choose full encryption.
» Seventh: In the next step you will be asked to choose a specific encryption mode from New or Compatible. You can choose the second mode with external storage drives. As for your storage disks and partitions, you can choose New mode. But do not forget to activate the box in front of Run BitLocker system check in order to give Windows the ability to scan files before encryption.
» Eighth: In the last step, you will have to manually restart your computer. Then enter the password when trying to access the password-protected storage partition. After that, Windows will ask you if you are ready to start the encryption process. Agree and wait until the end.
» Ninth: The encryption process may take 20 to 30 minutes. But if the storage partition is very large or contains many files and different content of high-quality videos and movies along with a lot of documents, files and games, it may take more than 3 hours to encrypt them.
█ Protect files and folders on Mac
Unfortunately, protecting and encrypting folders with a password on macOS is a bit of a complicated experience because the system itself lacks any default encryption methods.
However, keep in mind that these extra steps, which may cost you a little time, will bring you a lot of security.
That is, you will first need to create an encrypted image of the storage disk using the operating system's native disk utility in order to encrypt the folders inside.
Fortunately, this application that we will use is available on all Mac devices without exception. Once this disk is created, you will be able to access it as if you were trying to access a separate partition. This means that you will be allowed to edit the disc, modify it, or even delete it if necessary.
All operations and actions that will be performed while creating the disk will be fully protected and encrypted with a password even if you try to move it to the Recycle Bin. Just follow these steps:
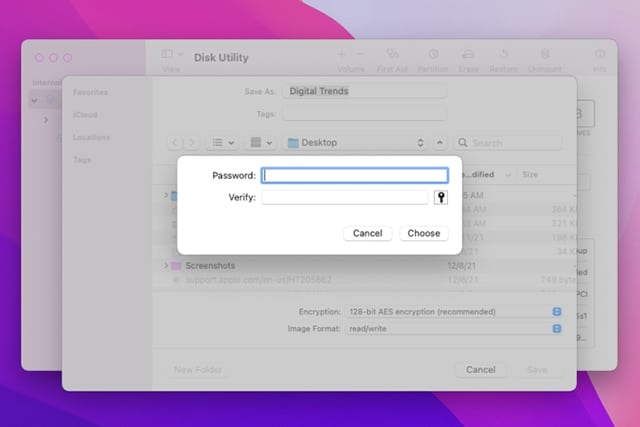
» First: From the list of applications, choose Disk Utility and open it.
» Secondly: After opening the application, choose File, then from the drop-down menu, choose Image from file. Now start searching for the file you want to encrypt and once you find it, open it by clicking Open.
» Third: Once you have set a new name for the folder or file that needs to be encrypted, click the Read/Write option from the drop-down menu under the Image Format section. Then you will find another menu under the Encryption section, choose 128-bit AES encryption.
» Fourthly: In the Password field, set your own password, then click Choose, then Save. Wait a few moments until you get a message from the app that it has finished encrypting this file.
» Fifth: Now all you have to do is test the amount of protection and encryption you have applied to this file. Try opening the disk image you just created, and you should see a help message asking you to enter a password. Enter the password if you want to access encrypted files.
» Sixthly: Permanently delete the original files (from the Recycle Bin as well) so that you don't forget them and that anyone other than you can access them.
Also read: What is Smart App Control in Windows 11 And why should it be activated?
Conclusion
We hope that the set of methods that we have presented to you in this article will be sufficient to protect and encrypt your files on Windows and secure them from unauthorized access.
If you share your device with a group of other users, whether they are family members or friends, when you are on campus or when you are in an Internet café, it is safe to rely on any of the strong encryption tools to ensure that your data is always protected.
In this way, you not only protect it from unauthorized access and prying eyes, but you also protect it from external threats and dangerous virus attacks that may be able to destroy your important files or encrypt them and deprive you of access to them.
Just remember in the end to remember well the password that you will use in your encryption operations. If you use BitLocker, it is best to keep your backup encryption key in a safe place away from the computer itself.